Verify correct Page
Sometimes you run into the problem to debug your page-object because it doesn't find some element on your page until you realize that your pages didn't open the page you expect to be and therefor the element couldn't be found.
For that case PopperFramework supports checkinig to be on the right page when getting elements
@Page
@VerifyBy(title="Title verified")
public interface VerifyPagePO {
    @PageAccessor(uri="/pages/titlePage.html")
    void open();

    @Locator(id="message")
    ILabel message();
}
Dividing a page into PageObjects
On complexe pages with a lot of elements it can be helpful to divide your PageObjects in smaller parts. Here is how it can be done using Popper Framework
@Page
public interface Testsite {
  @PageAccessor(uri="Testseite.html")
  void open();

  @Locator(id="header")
  Header header();

  @Locator(id="footer")
  Footer footer();
}

public interface Header {
  @Locator(id="homepageLink")
  ILink homepageLink();

  @Locator(id="logoutLink")
  ILink logoutLink();
}

public interface Footer {
  @Locator(id="companyLink")
  ILink companyLink();
}
Working with tables and other list-types
Imagine you have a Website with a table like this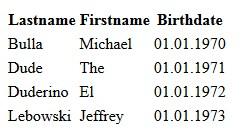
To accesss the elements of that page you can use a PageObject like this
@Page
public interface TablePO {
    @PageAccessor(uri="/pages/table.html")
    void open();

    // using tr[.//td] to exclude headers (using th instead of td)
    @Locator(xpath="//table[@id='users']//tbody/tr[.//td]")
    List<User> allUsers();

    @Locator(xpath="//table[@id='users']//tr/td[@class='firstname']")
    List<ILabel> allForenames();

    @Locator(xpath="//table[@id='users']//tbody/tr[.//td]")
    Set<User> allUsersAsSet();

    @Locator(xpath="//table[@id='users']//tbody/tr[.//td]")
    User[] allUsersAsArray();

    @Locator(xpath="//table[@id='users']//tbody/tr[.//td]")
    int elementCount();

    @Locator(xpath="//table[@id='users']//tr[@id={0}]")
    User userById(String id);

    public static interface User {
        @Locator(cssSelector=".firstname")
        ILabel firstname();

        @Locator(cssSelector=".lastname")
        ILabel lastname();

        @Locator(cssSelector=".birthdate")
        ILabel birthdate();
    }
}
You may count elements on your page, too. Just use as the return type of a method an int, short or long, than you will get the number of that elements on you page instead of the elements itself.
Defining own Locators
Say you have a framework creating for you elemement ids looking like this somePrefix_id_somePostfix. You don't want to have to define the pre- and postfix anytime you create a locator. The solution: Define your own locator annotation
@Target(ElementType.METHOD)
@Retention(RetentionPolicy.RUNTIME)
@Documented
@ImplementedBy(MyOwnValidatorImpl.class)
public @interface MyOwnLocator {
    String value();
}

public class MyOwnValidatorImpl extends AbstractLocatorAnnotationProcessor<MyOwnLocator> {


	public MyOwnValidatorImpl(WebDriver webdriver, WebdriverContext context, IPoFactory factory,
			PageObjectImplementation parent) {
		super(webdriver, context, factory, parent);
	}

	@Override
	protected Loc getLoc(MyOwnLocator annotation, LocatorContextInformation info, Object[] args) {
		return Loc.id("somePrefix_" + annotation.value() + "_somePostfix");
	}
}

@Page
public interface SelfImplementedLocator {
    @PageAccessor(uri="/pages/defaultAnnotations.html")
    void open();

    @MyOwnLocator("42")
    ILabel loc42();
}
Using other Element-implementations
Your methods may return an interface element-type like ITextbox, but PopperFW needs to know what concrete type rto instantiate to use that element. For all default-element-types PopperFW uses the right implementation. But sometimes you need to help PopperFW to decide the right implementation. PopperFW supports deciding the right implementation at three levels
Element-Level
At element level you may annotate an Locator-method with the @Type-annotation to define the datatype to use (Regard that the given datatype has to implement the Interface of the method):
@Page
public interface TextareaPO {
    @PageAccessor(uri="/pages/severalTypes.html")
    void open();

    @Locator(id="textarea_normal")
    @Type(TextArea.class)
    ITextBox textarea();
}
PageObject-Level
At page level you may define an element factory to decide for what interface which implementation to use.
@ElementFactory(GxtElementFactory.class)
@Page
public interface ManyTypesWithElementFactoryPO {
    @PageAccessor(uri="/pages/severalTypes.html")
    void open();

    @Locator(id="button_normal")
    IButton button();  // will return a GxtCheckbox instead of DefaultCheckbox

    @Locator(id="checkbox_normal")
    ICheckbox checkbox(); // will return a GxtCheckbox instead of DefaultCheckbox
}

public class GxtElementFactory implements IElementFactory {
    private static final Map<Class<?>, Class<?>> impls = new HashMap<Class<?>, Class<?>>();
    static {
        impls.put(IButton.class, GxtButton.class);
        impls.put(ICheckbox.class, GxtCheckbox.class);
    }

    @Override
    public Class<?> getImplClassForElement(Class<?> clazz) {
        return impls.get(clazz);
    }

    @Override
    public void addImplClassForElement(
            Class<?> interfaceClass,
            Class<?> targetClass) {
        impls.put(interfaceClass, targetClass);
    }
}
Application-Level
If you want to use a special ElementFactory for your Whole application you may register it in IPoFactory
WebdriverContext context = new WebdriverContext();
context.setDefaultElementFactory(new GxtElementFactory());
Defining your own Webelements
Imagine you have created an own control (or call it widgtet) that's not described by any one of the default element interfaces from Popper. In that case you can create your own definition
public interface ISpecialElement {
    public void doSomethingSpecial();
}

public class SpecialElement extends AbstractWebElement implements ISpecialElement {

    public DefaultLabel(String name, PageObjectImplementation parent, Loc loc, WebdriverContext context) {
        super(name, parent, loc, context);
    }

    @Override
    public void doSomethingSpecial() {
        getDriver()...
    }
}

@Page
public interface TextareaPO {
    @PageAccessor(uri="/pages/severalTypes.html")
    void open();

    @Locator(id="textarea_normal")
    @Type(SpecialElement.class)
    ISpecialElement special();
}
When defining a new type of Element (like ISpecialElement) you may register the implementation in DefaultElementFactory without overwriting an existing type.
context.getDefaultElementFactory().addImplClassForElement(ISpecialElement.class, SpecialElement.class);
Defining your own Configuration
WebdriverContext allows you to do some configuration on the WebDriver to be used. Sometimes the configuration-ability of WebDriverCOntext isn't enough to fullfill your requirements. In that case you my want to create your own WebDriver-Configurator
public class MyConfiguration implements IWebdriverConfig {

    @Override
    public WebDriver createDriver() {
        return new FirefoxDriver();
    }

    @Override
    public Browser getBrowser() {
        return Browser.FIREFOX;
    }

    @Override
    public String getBaseUrl() {
        return "http://localhost:8080";
    }
}

public class LoginTest {
    protected IPoFactory factory;

    @Before
    public void setup() {
        WebdriverContext context = new WebdriverContext();
        context.setConfig(new MyConfiguration());
        factory = context.getFactory();
    }

    @Test
    public void testLogin() {
        Login login = factory.createPage(Login.class);
        login.open();
        login.usernameTextbox().type("Michael");
        login.passwordTextbox().type("secret");
        login.submitLoginButton().click();
    }
}